-
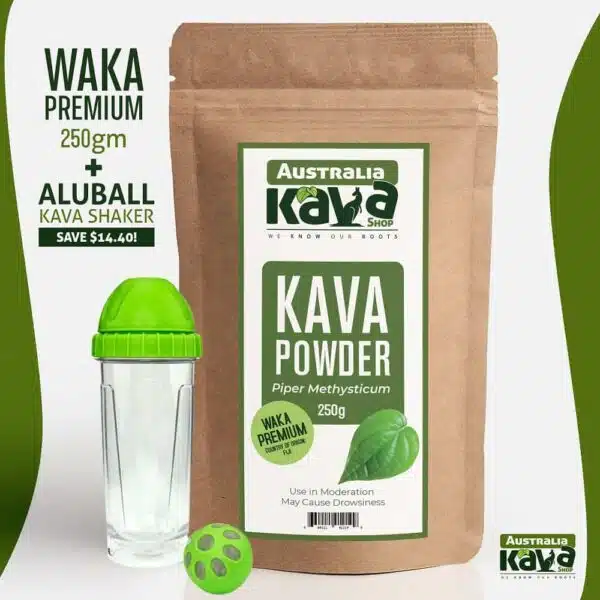
$56.95 – $184.95
Get notified This product has multiple variants. The options may be chosen on the product page Out of stock


What Is The Difference In The Brewing Methods?
No matter how you brew kava, the results are going to be similar, you’ll still have the same effect and taste. So, what is the difference? The main difference is the time it takes to prepare the brew, the batch size, and the level of convenience when mixing your kava. Therefore, it really boils down to your own personal preference, so we highly recommend trying a few different preparation methods before selecting the brewing method that is right for you
Which Method Is Right For Me?
Some people really enjoy the traditional, ritual preparation method, while others would rather use shaker bottles or blenders for speed and convenience. In this guide, we’ll cover the three most popular methods, the traditional method, the shaker bottle method, and the blender method. We’ll explain what equipment you’ll need and give you some great hints and tricks. These include, how much powder and water to use plus step-by-step instructions for preparing your kava drink effectively.

Method 1: Traditional Kava Preparation
To many of the indigenous Pacific Island cultures where kava grows, the kava preparation is just as important as its consumption The ritual involved with preparation adds to its value as a medicine and for ceremonial purposes.
Kava is great for stress reduction, sleep promotion, or spiritual exploration, so we strongly recommend you give it a go the traditional way at first. The extra 10 or 15 minutes it takes to prepare in this way helps to put you in a relaxed and mindful state.
The traditional method we discuss here is as close to the real process used by the Pacific Islanders (including Hawaii) as possible. However, there is one difference. Some Vanuatu kava preparation traditions include chewing up the roots and spitting it out again to make the tea. As you can imagine, your friends or family who will be drinking your tea, might prefer to use our pre-powdered kava root instead. We promise, the results are the same as chewing and it is a far more sanitary way of preparing your brew.
With that aside, let’s explore the process of the traditional way!
Things You’ll Need To Make Your Traditional Kava Tea:
- A strainer bag (muslin bag)
- High-grade ground kava root
- Warm water
- Medium-to-large bowl to mix kava in
- Small cups to drink from
- A small kitchen scale

Step 1 – Measure Out The Kava Root Powder
The first step is to measure out the dose of kava. The dose can vary from one person to the next, but a standard dose is about 10 grams per person. If you would like to have some extra kava tea ready for use a few hours later, we recommend doubling this amount.
Weighing the kava on a scale is by far the most accurate way to measure it. However, if you don’t have a lot of time or access to measuring utensils, you can also measure with a flat tablespoon. 10 grams is equivalent to roughly 3 or 4 flat tablespoons, but of course, this will depend on how finely the kava powder is ground. For example, micronized kava is closer to 2 tablespoons per 10-gram dose. Therefore, it’s always best to double-check the type of kava you have before starting the preparation process.
Step 2 – Fill The Strainer Bag With Kava
Once you’ve measured out the kava, put it in your strainer bag. Not sure what strainer bag you need? Well, you have a few options to choose from for a good strainer. The option that we recommend is the use of a muslin strainer bag. Using a muslin strainer bag for your kava tea allows you to close the bag and tie it off to avoid spilling the powder as you knead the kava into the water.
If you don’t have a muslin bag, no worries. You can also use a cheesecloth or even an old t-shirt. (Preferably washed of course!) or even pantyhose. You just have to be careful that the cloth doesn’t open up and spill all your powder into the bowl as you’re mixing in step four. Place the strainer in the bowl when you’re finished.
Step 3- Add The Water to The Kava
The next step is to add the water. Ideally, the water should be warm, or mildly hot. We recommend that the hot water is about the same temperature as the hot water from your tap. In Australia, this is approximately 50 degrees Celsius.
It’s important to not add boiling water here, because you won’t be able to mix it all together with your hands if it’s too hot to touch. water above 55 Celsius will also start to decompose the lactones, causing a reduction in potency. Traditionally, room temperature water is used. When adding the water, you want to add roughly 4-5 times as much water in milliliters as kava in grams. This means, our standard 10 gram dose of powder from the Australia Kava Shop would require roughly 40-50 mL of water. However, you can always add more or less water depending on your personal preferences. The less water you use, the stronger the brew will be. If you want your brew to have a milder effect profile, feel free to add more water.
Once you are ready, pour the water over the muslin bag full of powder, and let it sit for about 5 minutes to absorb as much of the water as possible.
Step 4 – Mix Your Kava and Water
After you have let the kava sit in the water for a few minutes, you may notice the water is starting to develop a murky appearance. This is a good sign, the kavalactones are diffusing into the water.
Want to make a strong brew? Then you’ll need to spend a few minutes mixing – the more mixing/kneading time, the better.
Knead the kava-filled muslin bag or strainer into the water. You want to move the kava powder around the water as much as you can. You can also do this by squeezing it with your hands. All up, this will take about 5-10 minutes.
Once you’re done, you’ll notice that as you do this, the water will become murkier and will develop a light brown colour. It might look like muddy water, but don’t worry, it won’t taste like it!
Step 5 -Time to Drink Your Kava!
Once you’ve finished kneading and mixing in the water for about 10 minutes, your kava is ready to drink.
Simply remove the strainer bag from the bowl and squeeze as much liquid out of the bag as possible before setting it aside. Now, don’t throw your strainer bag away! You can easily get two or three more washes of lower-strength kava out of this if you want.
Helpful hint: You can throw your kava strainer bag in the freezer to keep it fresh and use it again another day.
With the strainer bag removed, you’re left with a bowl of fresh kava tea ready for drinking. So fill up your cup right away with some delicious fresh kava and start drinking!
Want to know the traditional way of drinking? You would take your small cup and scoop the kava brew out from the bowl. When drinking with friends, always fill their cups, before your own.
Not a fan of the taste of kava? Another way you can prepare it is like ice tea. This helps it go down easier. You can place the bowl in the fridge for an hour, or add the kava to a cup of ice to give it a smoother flavour.
Do you have a bit of a sweet tooth? Then you can also add in different sweeteners like honey or agave into your blend. This may not be the traditional method of making kava tea, but honestly, there’s no right or wrong way to do this. Do whatever you need to make drinking it enjoyable.
Method 2: Shaker Bottle Kava Tea
In the busy world that we live in today, you most likely don’t have the time required to make traditional kava tea. But not to worry, there are more convenient ways to make your kava tea.
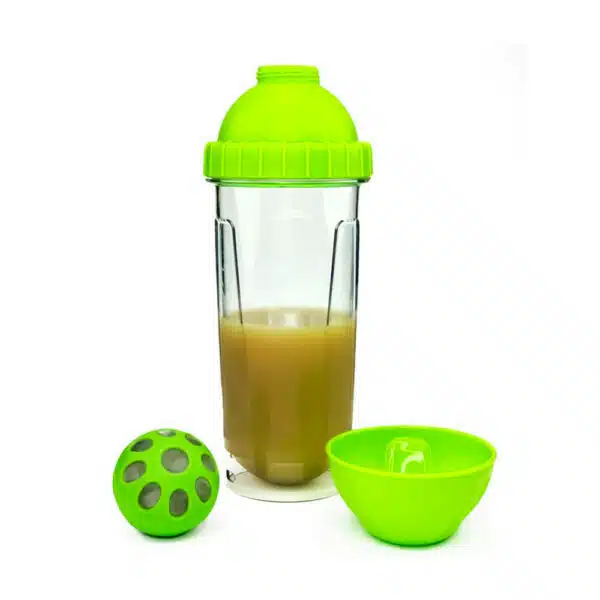
When making your kava tea for a single serving, the best way to do it is with a kava tea shaker bottle. A great example of one is the AluBall Kava Maker.
This kava tea shaker bottle is really similar to the ones you’d use if you were making a protein powder at the gym. The main difference is that there is a strainer ball inside the bottle that you put the kava into.
You use it by putting the kava powder into the strainer ball, then you add water and shake, shake, shake! It’s basically the same as making a protein shake.
What You’ll Need to Make Your Kava Drink In A Shaker:
- Kava shaker cup
- High-grade ground kava root
- Warm water

Step 1: Measure the Kava
Just like the traditional method, you start by measuring your powder. We always recommend measuring in grams, however, if you are time-poor, you can also use a tablespoon. When measuring your Vanuatu kava, you’ll find you typically need about 10 grams, but depending on your preference for the taste and strength, it can be as little as 5 grams or as large as 15 grams. Note, if you are using a shaker, you may be limited in the amount of Vanuatu kava you can use based on the size of your shaker ball. If you want to make a larger portion to share with friends, we recommend using the traditional method or the blender method.
Step 2: Fill The Shaker Ball With Kava Powder
After you measure your kava powder with either grams or a tablespoon, you can then fill your shaker ball and place it back inside your shaker. Once you start making your kava drink reguarly, you will tend to find that you know how much to put into your shaker ball and won’t need to measure it every time you make a drink.
Step 3: Add Water To Your Kava Shaker
Once you’ve added the ball back into your shaker, you add the water. This is typically about 20 times as much water in millilitres as you used in grams.
Again, if you are time poor, most kava drink shakers will come with a pre-defined line on the outside of the bottle. This gives you an indication of how much water to add to mix your drink.
Step 4: Shake Your Kava Drink To Mix!
Ready? Then seal the shaker and shake, shake, shake! You should shake the bottle for as long as you can to help get as much of the active kavalactones from the powder, into the water.
We recommend you shake for 5 or 10 minutes for the best results.
When you’re done, hopefully you’ve enjoyed a good workout with all that shaking! Plus, the water will have turned a light brown, muddy appearance. You’re now ready to enjoy that well deserved kava drink!
Step 5: Drink Up and Enjoy!
Once you’re done shaking, remove the lid and enjoy your kava drink. But don’t forget to remove the strainer ball!
Now are you an ice latte type of drinker? Then you will love to know that you can also put the kava shaker in the fridge to cool for a smoother flavour and that refreshing taste on a hot summers day.
Also, if you happen to have any left over, you can also save it for later. Just make sure that when you go to drink it again, you let the kava that has settled on the bottom of the shaker redissolve into the mix.
Method 3: The Blender Method
Lastly, another great, efficient way to make your kava tea is to use a blender. This is the fastest way to make a strong kava brew in a short amount of time.
What You’ll Need To Make Kava Tea With A Blender:
A blender
High-grade ground kava root
Warm water
Some cups
A small kitchen scale

Step 1: Measure The Dose of Kava Powder
Just like any other methods, start by measuring out your kava.
Now blenders are a great option if you are making a large batch for friends or family. It depends on the size of your blender, but making small batches tends to waste the powder. If you are making kava tea for one, we recommend using a small, single blender or a shaker bottle.
When measuring per person, you will typically need about 10 grams of kava (3 – 4 tablespoons). If preparing for a larger group of four people, you can multiply it by four and use approximately 40 grams of kava. Once you’ve measured the kava out with a scale, or measuring spoon, add the powder straight into the blender.
Step 2: Add Water To Your Kava
Next, add the warm water. Remember, not too hot; it’s best to use warm water, around the same as your tap at home.
For 10 grams of kava, you’ll want to add about 40-50 millilitres of water. This works out to about 4-5x as much water in millilitres as kava in grams. The same goes for making more for a larger group. When ready, add the water directly to the blender.
Step 3: Blend The Kava and Water
Now you’re ready to blend. Turn the blender on and mix together for approximately two minutes. This will blend the kava into the water, but do it in a far more efficient manner. Also, it will typically yield a stronger taste than the other two methods we’ve mentioned above.
Step 4: Strain Your Kava Tea
Once you’re done blending, you’re going to need to remove the root fibres before you drink. The fastest way to do this is by straining your drink. Typically, you would use a muslin cloth or cheesecloth to do this. You may read other sources that recommend using a coffee filter. We don’t recommend this method as it can make you lose some of the active kavalactones as well. This would result in a lot lower potency and defeat the purpose of your kava drink.
Step 5: Drink Your Tasty Kava Tea!
Once you’ve strained your kava, it’s time to drink!
If you have made a large batch with your blender, you can store kava tea in the fridge for up to 3 days.
This method is a great way to make large batches for yourself over a few days or for a group of friends or family.

Final Thoughts: Making Kava Drinks and Teas
In the end, it comes down to your personal preference. If you like the ceremonial process of the traditional way, then this is a great method to use, as it is a peaceful preparation process. However, if you’re leading a busy life or are looking for a convenient and efficient way to make your kava drink then the blender and shaker bottle methods are both great options too.
Ultimately, it just depends on your personal preference and time available.
To find out which method is best for you, and which taste you prefer, have a go at each of the methods we’ve listed above. You might be surprised at which method and taste you prefer. Also, play around with the ratio of powder to water too. Some people prefer a stronger blend, while others enjoy a more milder taste. Ultimately it comes down to your choice of how much water to add to your kava.
The same goes for the amount of Vanuatu kava powder to add to your water. If you prefer a stronger drink, 15 grams per person is a great option for you. But if you want it milder, 5 grams is recommended. Lastly, if you are trying kava for the first time, we always recommend that you start with a lower dose and build up gradually until you find one that works best for you. You might also want to try Instant Kava for a hassle free start on your kava journey.
Enjoy your kava drink today!